Swedish princess cake – Prinsesstarta
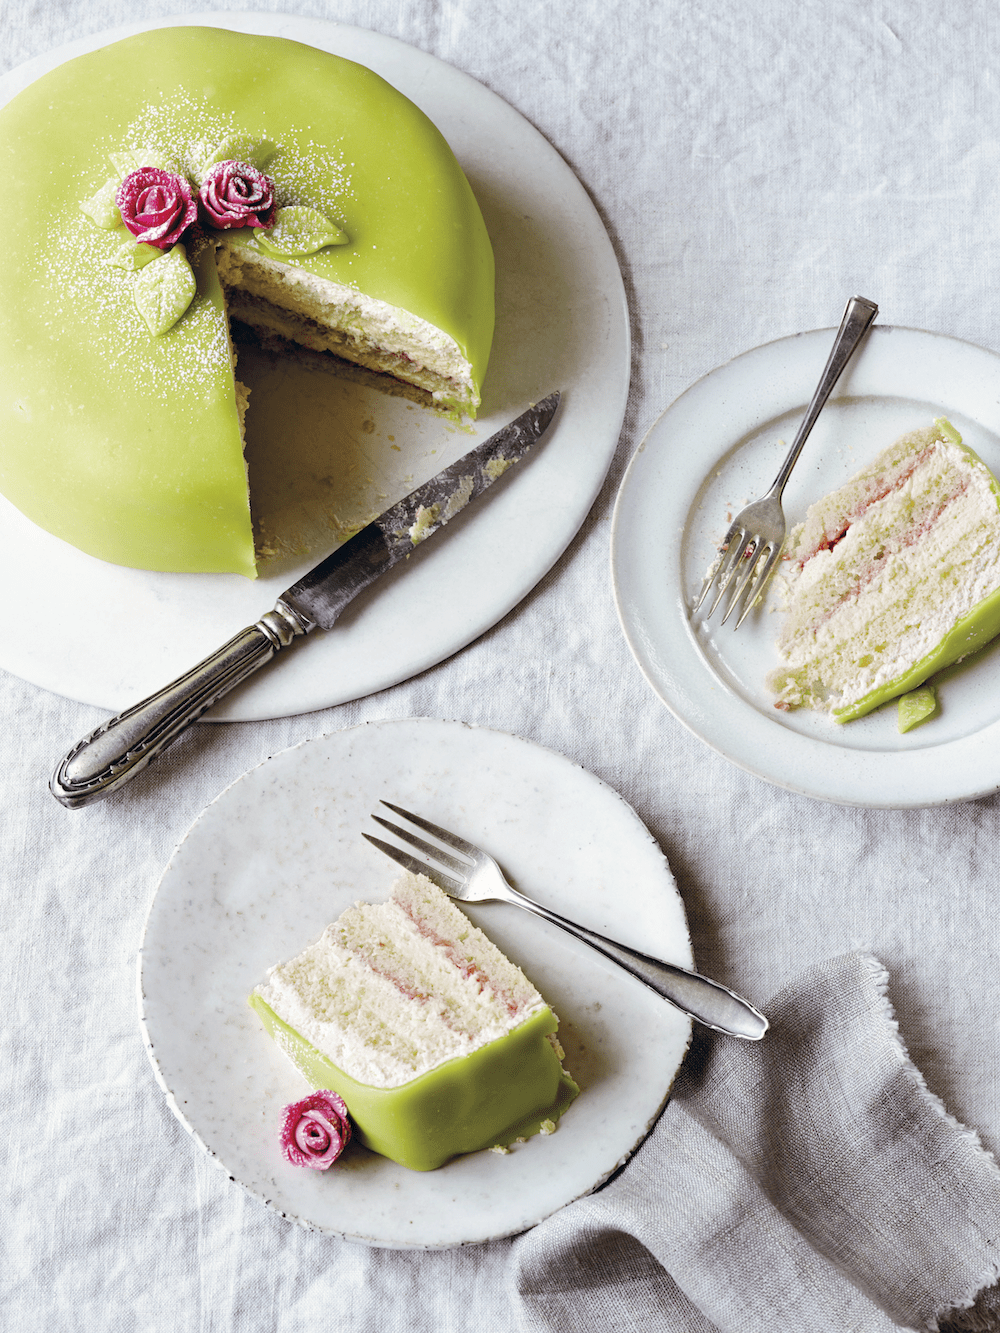
By popular demand, we are now posting the princess cake recipe from Bronte’s book Fika & Hygge – with a few added hints and tips for making the perfect cake. It’s not the easiest cake in the world to make, let’s be honest. But you can do it! You just need some patience and a bit of guidance… And soon you’ll have the perfect Fika cake for your afternoon tea party – and what a beautiful centre piece it is on the table. The cake stems from the royal household in Sweden. Back in the 1940’s when the 3 princesses were young, the Home Economist was teaching them how to cook and bake. This cake was called Green Cake and was published in the book (The 3 Princesses’ cookbook) as The Green Cake but eventually it earned the name Princess Cake as popularity grew – for obvious reasons. There are a few secrets to making a good Princess cake – the first is to get the ratio right of base, cream and pastry cream and marzipan. Too much of either and it is just a bit sickly. The second thing is perfecting the marzipan – it is tricky. It may take a few attempts to be able to pull the marzipan around soft whipped cream without making a mess of it – here, patience, cold clean fingers and perseverance is key. We’ve added some cheat’s steps along the way if you want to make things easier for yourself. In fact, lots of people use a few cheat steps along the way – and we think this is perfectly fine. If you use all the cheat’s steps, you can actually whip up a princess cake in 15 minutes from start to finish – and one that still tastes good and will look great. The original recipe can be found in the book Fika & Hygge, by Bronte Aurell, published by Ryland Peters and Small, photography by Peter Cassidy.
Author: Bronte Aurell
Ingredients
- 3 layer cake bases – can be bought here
- 1 portion pastry cream (around 600g) – can be bought here
- 600 ml whipping cream
- 2 tablespoons icing sugar
- 150 grams raspberry jam – can be bought here
- 200 grams green marzipan lid – can be bought here
- pink and green modelling icing for flowers and leaves decorations
- Tip: Depending on your schedule you might find it best to make the pastry cream first so it can cool and have time to set whilst you get on with the cake layers – but this is up to you.
Layer Cake Bases
In our book we do not use baking powder – which is a genoise sponge – but if you are a little unsure add the mentioned 1 tsp baking powder and your rise is pretty much guaranteed. For more experienced bakers, try without (and you avoid the baking powder slight aftertaste and get a lighter result).
- 3 baking sheets lined with non-stick baking paper (and ideally a few puffs of non-stick spray).
Pastry Cream
- 500 ml whole milk
- 1 vanilla pod seeds scraped out
- 1 whole egg plus one egg yolk
- 100 grams caster sugar
- 30 grams cornflour
- 25 grams butter
- pinch of salt
Make your own marzipan (or buy here):
- 200 grams finely ground almonds use ground almonds, then re-grind them a few ties to make them extra fine.
- 100 grams granulated sugar
- 100 grams icing sugar
- 1 teaspoon almond extract
- 1 medium pasteurised egg white
- green food gel
Instructions
- Pre-heat the oven to 180C, 350F, Gas 4
- In a stand mixer with the whisk attached, beat the egg and sugar on high until you reach ribbon stage. This means when you can see the traces of the mixture when you most the whisk through it. It will take a good 4-5 minutes to reach this stage and it’s crucial – especially if you are not using baking powder, this is your only opportunity to get air into the mixture.
- Using a 20cm plate, draw 3 circles on your baking paper. Set aside.
- Combine the flour, salt and baking powder if using. Sift this into the egg mixture and very carefully fold to combine, using a figure of eight, until all the flour is incorporated. Be very gentle at this stage, but thorough. Pour the cooled, melted butter down the side of the bowl at the end and give a final few folds to incorporate it.
- Divide the mixture evenly between the 3 circles and gently use your spatulas to guide to the drawn edge.
- Bake in the oven for 5-8 minutes or until baked through and lightly browned. Allow to cool down. To remove from the baking paper, if it sticks, wet your hands and allow to damped the underside of the baking paper, this release the cakes.
- Trim any edges so you end up with 3 perfectly round and even sized bases.
- Tip: You can use 3 x 20cm baking tins if you have.
- Cheat’s tip: Use ready bought layers – these from Karen Volf are brilliant. Comes with 3 layers and are ready to use. They are light and not too sweet – a really good option.
Vanilla Cream Patisserie
- In a saucepan, heat the milk with the vanilla seeds.
- In a separate bowl, using a mixer, whisk the eggs, sugar and corn flour.
- When the milk reaches just boiling point, take it off the heat and pour 1/3 into the egg mixture, whisking continuously.
- Pour the egg mixture back into the hot milk, return to the stove and bring to the boil whilst whisking. Whisk continuously as the mixture thickens and keep on boil for just under a minute (this removes the cornflour taste).
- Pour into a cold bowl and leave to cool and set for several hours in the fridge. To avoid a ‘crust’ forming on top, place clingfilm straight on to the cream, covering the entire surface.
- Cheat’s tip: Use an instant cream mix – we like this one from Dr. Oetker – just mix one sachet with 500ml whole milk, whisk for 1 minute and leave to set in the fridge. It has a nice vanilla taste and does not taste powdery – this is a great pastry cream alternative. You can also use this one for baking.
Green Marzipan Lid
- Here’s the admission: I usually buy green marzipan. Why? Because it’s easy and smooth and it’s ready to use. You can get one that fits a 20-cm cake here – Odense Green Marzipan Lid.Buy a covering marzipan from the supermarket and colour it green (should be minimum 25% almonds). To colour the marzipan, you must use a gel colour NOT a liquid green food colouring. If you use a green liquid colour, your marzipan will get sticky and hard to work with – and you will have to add a lot of extra icing sugar to make it workable.
- Place all the ingredients in a food processor and blend until you have a smooth marzipan. Roll the mixture into a ball and wrap tightly with cling film. Chill in the refrigerator for at least one hour before using.
- Because this marzipan contains egg white, use within a day.
How to assemble
- The most important bit – and the hardest step. Take your time and you will be fine!First, arrange base layer on your serving tray. Add raspberry jam, then a good layer of pastry cream. Add middle layer – and repeat.Add the top layer and then spread a thick layer of whipped cream (make sure it is quite firm and cold). Use a palette knife to smooth the top reasonably flat – you don't want too much of a dome.Roll out the marzipan into a round circle – it needs to be big enough to cover the whole cake. You get one stab at this bit, so carefully lift the marzipan and place on cake.Gently – bit by bit – pull down the edges all around the cake. You need to do it very carefully or you end up with folds – and the cake is too fragile to use a smoother. Practise makes perfect on this step, but patience will go along way.Cut off excess marzipan around the edges to leave a neat edge, decorate with a pink icing rose and dust with icing sugar just before serving.
Equipment
- piping bag & spatula


