


Danish pastry as we know it – layers of buttery yeast dough – came to Denmark in the 1850s with bakers from Austria. These bakers came to cover a long, nationwide baker strike – and in the process, taught the homegrown bakers a thing or two about pastry. Over time, the dough changed slightly – and became the Danish Pastry we know and love today.
In Denmark, Danish Pastry is actually known as Wienerbrød – literally: Vienna bread. In the rest of the world, it’s ‘Danish’.
At first, making your own Danish pastry can be a bit daunting – but it needs less folding than say a croissant dough, so in some ways it’s actually easier. It’s only folded three times – making it a total of 27 layers.
A word of warning: It will leak butter during baking, so be prepared for this and add a tray to cover spillage. But is it worth it? Oh yes, very much.
There are several components needed in Danish pastry making- all recipes are on this blog but not all in this blog post. We also advise you to invest in Bronte’s book Fika & Hygge which has all you need for Scandinavian baking – available on our website as well as on Amazon and all good booksellers. Recipes may vary slightly from here, but the basics are the same. Note that in Bronte’s books both general and US measures can be found.
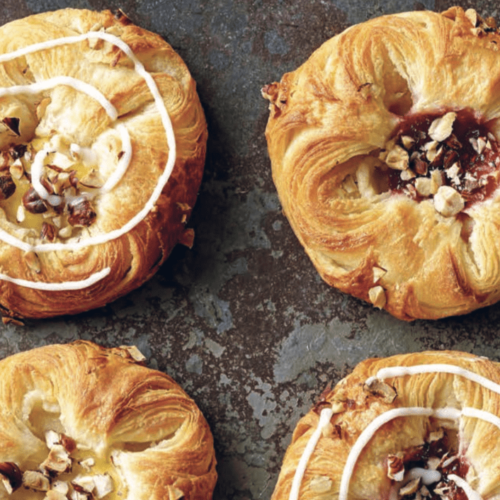
We’ve borrowed some of the photos from the book here with credit to photographer Pete Cassidy.
Basic Danish Pastry Dough (Wienerbrød)
Ingredients
- 25 g fresh yeast or 13g active dry yeast granules
- 150 ml whole milk finger warm no more than 36c (97–98°F)
- 50 g caster sugar
- 50 g butter softened
- 350 g strong white bread flour plus extra for dusting
- 1 tsp salt
- 1 egg - plus 1 yolk
For the layers:
- 350 g butter slightly softened (not too soft)
- 25 g plain flour.
- a baking sheet lined
Instructions
- If you are using fresh yeast, add the yeast and whole milk to a stand mixer with a dough hook attached. Mix until the yeast has dissolved.
- If using active yeast granules, pour the milk into a bowl, sprinkle over the yeast and whisk together. Cover with clingfilm/plastic wrap and leave in a warm place for about 15 minutes to activate and become frothy and bubbly.
- Pour into the mixer with the dough hook attached.
- Stir in the sugar and softened butter, then mix the flour with the salt and start to add, bit by bit. Add the egg halfway through along with the remaining flour. Keep mixing with the dough hook for a good 5 minutes. The resulting dough should still be a little bit sticky.
- Cover the bowl with clingfilm and leave to rise for an hour or until doubled in size.
- Turn the dough out onto a floured surface and knead through, adding more flour as needed until you have a stretchy, workable dough and then roll the dough out into a big square 35 x 35 cm.
- For the filling, mix the butter with the flour into a just mouldable ball using your hands. It’s important this mixture ends up being a similar consistency and workability to the dough – this will make it easier to roll. If your hands are too warm, use a rolling pin and beat the butter flat between two sheets of baking parchment. Flatten the butter out to a square around 25 x 25 cm, then place this butter square onto your dough at a 45 degree angle so that the dough corners can fold back in to cover the butter.
- Carefully fold the dough corners over the butter until you have completely enclosed it – a bit like making an envelope! Dust with flour and very carefully roll out the package to a rectangle around 30 cm x 50 cm, then fold the layers the short way twice so you end up with a rectangle approx 30 x 15 cm (3 layers with butter). It is important that you roll carefully so that the butter stays inside the pastry package at all times.
- Place the dough on the prepared baking sheet, cover with clingfilm and chill for 15 minutes in the refrigerator. This will help the butter chill so you can keep working it.
- Repeat the folding process: roll to a rectangle and fold back on itself – you now have 9 layers of butter. Again, rest the dough in the fridge for 15 minutes, then repeat the rolling process again so you end up with yet another rectangle in 3 folds with 27 layers of butter in total. After a final rest in the refrigerator, your pastry is now ready to shape into whatever pastry you want to bake.
- At any stage during the making of Danish pastries, if your hands or the dough get too warm, step back and cool things down a bit, as this can spoil your end result.
- Danish Pastry baking time varies depending on your pastry size and weather you are making a kringle, Kagemand (Birthday ‘Cake man’) or individual pastries – but as with puff pasty, baking it through is essential as nobody likes a soggy bottom bit of the pastry. Usually 200C (400F), Gas Mark 6 works – but if it is getting too brown too quickly, turn down a bit and/or cover with foil.


